Random thoughts and bits of life of a coffee loving artist

Wednesday, August 11, 2021

Celestial World Tree – Part 5 (END)

You read the title right! This is the final chapter of the project! As I take you through the last leg of this adventure, let's remember the ups and downs that Celestial World Tree – Part 4 brought. Progress was made and accidents caused by eagerness were overcome with creative solutions. So let us wrap this up, shall we?


All of the Decorations


Even with how well the color pencil covered up the text that was still on the lid, the fact that the indents were still visible was going to bother me until the end of time. I had a plan on how to cover this up at least – Leaves. I ended up ordering some Mulberry Paper Flower Leaves meant for scrap booking. They came in a variety of greens but I picked out a couple of the lightest ones from the batch I received and proceeded to attack them with watercolors. It was a fairly simple process in coloring them, luckily. I went with the colors that I had for the interior panel so there was a natural gradient from green to blue. It took a little bit of time for them to dry, check on if the colors were how I wanted, add if needed then dry again but the end result was one I was happy with. Once dried, I carefully glued them into position on the lid (adding a left over one to the internal panel for a bit of cohesion). Digging around in my eclectic collection of bits and bobs, I also added a couple of shiny trinkets which went well with the entire look.


The tassel that was to be added to the bottom portion of the box was something I was going to need to make myself. As a stepping off point, I ordered a variety pack of various colored tassels. Picking out a couple of the purplish ones to mimic the purple cording that I have in both pieces, I ended up combining them together. I had a holder for them that was originally from a piece of costume jewelry which they fit nicely in. Grabbing my tube of E6000, I securely glued the cluster into their new home and let the hole thing dry a couple of hours. Digging in my collection once again, I chose a beautiful hand made blue glass bead to be part of the top and found a bit of ribbon that would work with making the whole thing uniform. With how small the ribbon I decided to use was, I had to hold it in place with rather thin sewing pins until the adhesive dried.


Final Assembly


For those who have been here since the very beginning and have been paying attention, you
may have noticed that the lid in the rough draft concept and through most of the project up to this point had an eye-hook on top of a tassel which would have acted as a hanger for when
the lid was to be displayed separately. Well! I decided in the end that it was completely impractical. The tassel didn't go in the direction I wanted and instead flopped right in front which covered most of the design. So off the hook went. Once again I went through my supplies and found another picture hanging hook which I ended up gluing into position on the back of the lid. Doing a couple of test fittings, I was happy that the lid could still be slid into position without interference.


With that little issue solved, it was time to attach the large tassel I had put together onto the box. Attaching it to the eye-hook wasn't a problem but there was still the issue of how to cover the eye-hook itself without it becoming just a garish aesthetic disaster. Luckily I had some tiny Mulberry Paper Roses in a few colors in my collection. Picking out a couple of purple ones to tie everything together, I carefully wrappedthen glued them in place around the eye-hook. The entire assembly, once dry, was very secure with now worry that it would get knocked off by accident. Once everything was died, test fitted multiple times and cleaned up, I went ahead and made sure I didn't need to add anything else. With something as whimsical as this, it's easy to overdo it with decorations. Luckily enough, I knew when to stop. So off I went to see how it all would look on a wall with and without the lid in place. Of course the lighting in the room didn't do the box justice but I was more then happy with how the project as a whole looked. The lid and the internal panel compliment each other and stand strong on their own  or as a whole which was what I was aiming for in the first place. As I was wrapping up the project, I had given a friend a sneak peek of the end result. I was expecting the usual show of support and perhaps a question about something that I needed to clarify. What started off as a cheer for how the project came out quickly moved to talks of pricing and having the box on hold. So even before this blog wrap up was done being typed up, it would seem this has already found a potential home. Completely not complaining and I'm rather grateful that something I decided to experiment with has brought so much joy to someone. I think that is a suitable ending for this adventure. 

Tuesday, August 10, 2021

Celestial World Tree - Part 4

 Welcome back everyone for another episode of 'Why do I do this to myself'. I kid but there has been so many moments during the adventure of this project that I have found myself asking that very question. So, as a recap, in Celestial World Tree – Part 3 I was explaining the process I was doing with the lid and internal panel of the box along with what I still had to do to make the pair cohesive together if they were displayed separately. Let us jump back in, shall we?


Nearing the End

True to my word, I went back and started working on the details to both pieces. The lid took me a bit more time to make work. Going back and forth, adding suggestions of leaves to the tree so it didn't just look like a blob of color on the wood. Little white spots among both the blue and the green along with the purple string through the branches were nods towards the design that I had on the internal panel. As of the internal panel, subtle blue and green leaves in the background. I went as far as adding some veining to some of the leaves. Once done, gave both two coats of a clear glaze spray paint.


Hindsight is 20-20

So. Let's have a moment to acknowledge that there is going to be points of a project where your brain will be so excited about something that an entire step in the process is skipped. No amount of planning and telling yourself what you need to do next is going to help. The skip is going to happen. I experienced this once the lid and internal panel were done drying. There I was, sitting at my desk happily examining the results of the pieces with their new shiny surfaces. In my excitement, I took out my tube of E6000 clear multipurpose adhesive and
proceeded to glue the internal panel into position inside the box. It was only while making sure that everything was firmly in place that a realization occurred to me – I was planning on working on staining the outside and interior of the box so it didn't look unfinished during final assembly. There was no turning back at this point. The internal panel was already a tight fit and the adhesive wasn't about to let it go unless I wanted to destroy the entire box to get it out.


Now what do I do? Using wood stain would probably mess up the project. I wanted to keep the grain of the wood apparent so normal paint was also out of the options list. It was then, in my moment of cursing my eagerness, that I realized I had the answer right in front of me. Watercolors. Using a combination of shades of blue and brown, I mimicked the colors and transition of the tree that was depicted on the lid. The colors actually ended up enhancing the wood grain while bringing the whole project together. So once everything was painted and dried, I sprayed on a light coat of clear glaze over it all and let it fully dry overnight. Now all that is left to do is working on and attaching the accessories then final assembly to call this project complete.

Saturday, August 7, 2021

Celestial World Tree - Part 3

Greetings once more all of you lovely folks. I know that it's been a little bit since our last adventure in Celestial World Tree – Part 2 but rest assured that I have not been idle. Oh no! In fact I'm pretty sure this project has been slowly consuming my soul. I mean in a figurative stand point, not literal. If the later was the case then I would be attempting to contact all of my D&D friends to warn them I've apparently created a mimic in the real world. Anyways let us jump right back in and let me show you all where I am at the moment.


Back and Forth


In Part 2 of the project, I left off explaining that I wanted to include watercolors in with what I was doing which was why I had painted a thin layer of transparent watercolor ground on the
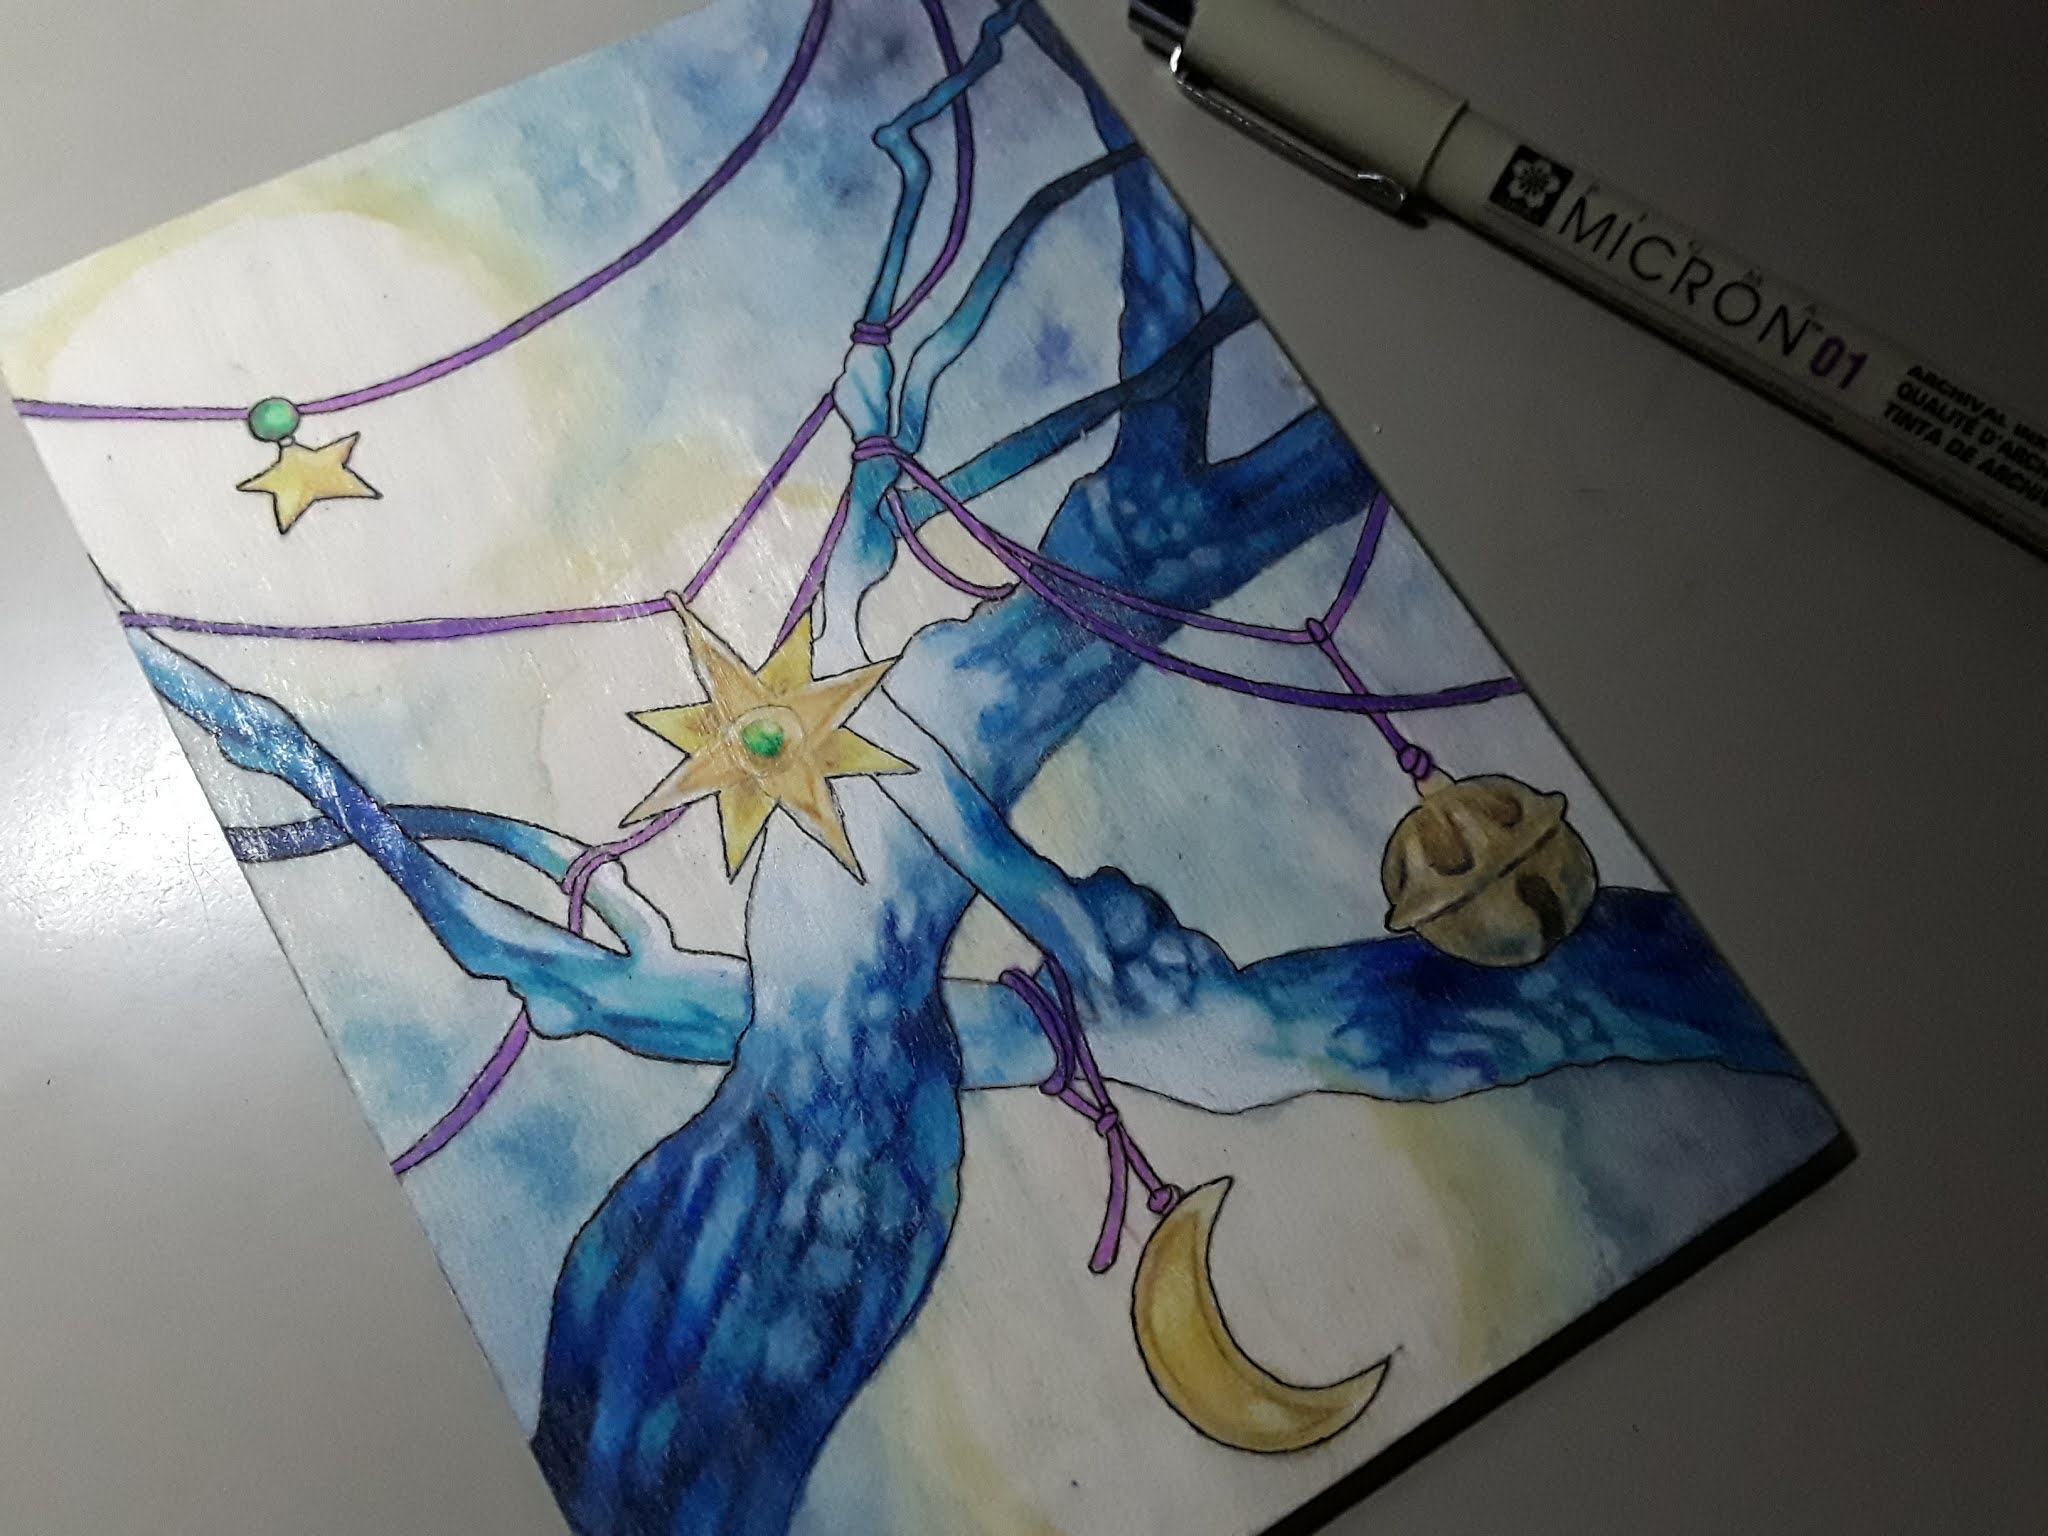
lid and internal panel. Once dried, I went ahead and lightly painted base colors as a guide to both pieces so that I had a better idea as to what I was doing before I brought forth the color pencils. With the internal panel, I was going to keep to the blues and purples with only little bits of yellow and green. So working gradually, I focused on the texture of the branches and finding myself discovering a narrative with it. I imagined that instead of the Red String of Fate, the strings that held up the various charms in the tree were purple. The stars, moons (and suns) would softly glow with their own light where as the bells would age but make sound. It was an interesting thought process to have as I slowly worked everything in.


Once the color pencil was in, I ended up painting another thin coat of transparent ground over it all and let it dry before I started to layer watercolors in order to help give an etheric glow to the charms. Since I was using the internal panel as a layout of how the lid was going to be, I set the internal panel aside to star working on the lid. Following the same process as before, however this time I wanted the center of the lid to be the same blue as the internal panel with the outside slowly fading to a somewhat more natural green and brown. Right away I could tell that the tree was going to give me troubles so I reminded myself to take it slow and give myself breaks. Once done with the color pencil part of it, I painted on another coat of the transparent ground and set it aside to dry before returning to the internal panel.


Using a 01 Micron pen (0.25mm), I carefully outlined the various elements of the internal panel. This took a bit of time, not just because of needing a steady hand but to also repeatedly clean the nib off and get the ink to flow how I wanted it. I'm loving how it is coming along so far but I can certainly tell that I want to have a little bit more dimension added to the panel before I go ahead and clear coat it. The lid, however, is showing me that much more work is needed

even as I get started on the watercolor I'm doing on top. So I'm plotting out what kind of details are going to be needed, what I need to do to tie both pieces in together (especially if they are to be hung together and not just as a single piece). With where I am right now with both parts, I'm estimating a few more days to get them to the point I want them but of course who knows.


Critiquing and Planning Ahead


Of course I know that there are going to be a good handful of you going "But Dawn! The internal panel is perfect! Seal it now!" Oh no no no, my eager art adventurers. There is much more that needs to be done first before either one can be sealed. The internal panel itself, though lovely, is lacking in depth and is just.. well.. flat. The charms need a bit more shading and the background itself is feeling more like an afterthought which is making the whole piece by itself to feel unfinished. Then there's the lid. Even at the point it is now, I can easily tell that it's no where near it's middle point. It needs more definition and shading where as the sun, moon and stars in the composition look like after thoughts. Yes, the center of the tree shares the same color scheme as the internal panel but that's it.  So there is still a lot more work to do on both to not only get them to where I want them but for them to compliment each other. It would be simply silly to have one look better then the other or for them to not go together at all. In the proceeding days, I will be working on the color, shading, detail and getting then to be as cohesive as possible before I start turning my attention to the extra elements and assembly. 

Tuesday, August 3, 2021

Celestial World Tree - Part 2


Welcome back to the next installment of this project. Let us jump right on in with this journey, shall we? Where we left off in Celestial World Tree - Part 1, I explained my thought process for what I wanted to do with the box, the brainstorming and rough design work for the project.


Cutting, Sanding, Glueing and Screwing

Sanded, Glued & Screwed
My wonderful father was certainly a huge help with this part since there was so many pieces that needed work. When I explained what I needed done, he was more then willing to lend his assistance. He was able to cut out the center logo of the lid while keeping the outlined circle intact then went ahead and followed my measurements for the interior panel and cut it out for me. I cut the back piece that was meant for the lid and made sure that the whole thing would be able to slide into position if the box was to be closed. Then onto the sanding! Going from a 220 to a 400, I made sure that various pieces were smooth. This also was the time I repeatedly test fitted the interior panel to see where I needed to sand a bit more for a better fit. The piece for the lid was glued into position and I waited overnight before doing another test fit. Luckily I had plenty of frame hooks at my disposal for the box and my father had tiny eye-hooks in his own stash of bits and bobs so that I could get those in place.


Working on Lines
Defining the Lines


Looking back at my rough sketches for the designs, there was a lot scribbles in spots that I knew I needed to rework before I transferred them to the wood. Grabbing another piece of paper, I measured out the sizes before using a light box to carefully trace the shapes. The design for the internal panel wasn't bad and only needed a couple of fixes. The lid, however, had a couple of elements that needed some reworking. Once done, taped transfer paper and the designs to their respective pieces and began the transferring process. Of course, once again the lid was being the problem child of this en-devour. I actually had to do the lid's design transfer in two parts – First had to cut the center of the design out and set it aside, transfer the outer design first then go back and do the center. There was probably a better way to do it but too late now.


Prep and Wait


Now that the transferring was done, I carefully looked over everything. Normally with my wood pieces I could go straight for coloring with my Prismacolor color pencils. However for the feel I wanted to go with, watercolors would be involved as well. Of course this meant that I needed to prep the wood first. So once I made sure my surfaces were clean and ready, painted on a layer of Transparent Watercolor Ground. With such things, make sure to wait the allotted 24 to 48 hours, depending on how thick or how many layers you've put on. Once I made sure that the surfaces were completely covered with as even a coat as possible, I set them aside to dry over night and contemplated my next batch of steps. At this point I will be keeping my fingers crossed that when I have in my head will be able to be made real. Guess we'll all find out in the next installment. Stay tuned! 

Sunday, August 1, 2021

Celestial World Tree - part 1

For those who have been following me on social media for some time may know that in between projects, I will go ahead and create altar boxes or mixed media art pieces from the various scrap wood/ wooden boxes I have. Well it's that time again but this time I will be taking you with me on this journey. So grab a beverage, some snacks and prepare for an interesting little trip through the process since I have no idea how many parts this is going to take.


Bits and pieces of the box
In the beginning, there was a box...

This particular box I've had in my stash for a number of years. It was the container for a particular brand of perfume and instead of a hinged lid like most boxes I acquire from salvage, this one actually slid into place. I knew I wanted to do something special with this but not sure what. The logo and information on the lid was branded in so any deep sanding would ruin the integrity of the wood since it was thin. Gessoing would not only loose the color of the wood but even through the process, there would be a faint indent of where the logo was. It took me some time of pondering (close to 2 months in the back of my mind while working on other things) to realize a simple solution to my problem – Just cut out the center logo. Well that certainly took care of that issue but now the next part of this insanity. The brainstorming and planning.


To the drawing board

Now that I have the center taken out of the lid, what was it that I wanted this box to be? I realized that I wanted to make this into a 2-part wall hanging art piece. The box itself with the lid in place could be one art piece but if the potential owner wanted to have the inside on display as well, the lid could be removed and hung as it's own art piece while the work inside the box could be displayed. Perhaps one of my more ambitious ideas for a project like this but

Rough draft concepts & brainstorming
I just couldn't stop myself. So away I went with roughly sketching out the concept designs along with brainstorming how I would need to trouble shoot some things. A lot of trial and error with a ton of erasing occurred just in the designs alone. Of course I will need to refine the designs before I work on transferring them to their respective positions but that's to be expected. The designs themselves may end up being mixed media with a combination of watercolor, ink and color pencil but I haven't quite fine tuned that thought process as of yet. 


Figuring out the pieces

So my first batch of things I needed to figure out while referencing my mad scribbling was how the design for the lid would work. I realized that I would need to secure a piece of wood on the back so the part of the design that was meant for the circle would be recessed. Luckily I had some thin pieces on hand that I could easily shape just larger then the hole for what I wanted to do. Covering up the bottom information would be a totally different endeavor which would include small paper floral leaves to cover it up. The design itself I would need to make sure didn't go all of the way to the edge so that the lid could still side in and out of the notches of the box without getting stuck or just not being able to be slid in. Hanging was the easier of the issues to sort out which was the use of a small eye-hook which would later be decorated and have a tassel from which it could be hung on the wall from.


The box itself was a little easier then the lid to sort out the mechanics with. A picture hook hanger on the back would allow it to hang from the wall without issue while another small eye-hook at the bottom would allow for some decorative tassel and charms to hang. The interior art work would be on a separate panel of thin wood/plywood which could be installed once it was time to get everything assembled. Of course there was going to be a lot of sanding in my future but hey, that's just how it is with this sort of thing. Now time to get started on getting all of these elements created and fitted. Stay tuned, folks!

Monday, April 12, 2021

Change of Plans

 They say that necessity is the mother of invention. Seems to be especially true when you're on a tight budget and trying to make use of a small space. Welcome back my fellow cleaning adventurers to another chapter of my reorganization mayhem. So if you've been following along up to this point, I've gone over the various containers that I've been able to get for some of my smaller supplies and told tales of my struggle to find a place for my larger pieces of equipment. This time around I shall lead you on a path of frustration of odd shaped supplies.


Childcraft Construction Paper Holder
Road of Obstacles
Acknowledging the fact that I needed a central space where I can store my various size pads of Bristol and watercolor paper so I could stop loosing them among other things, I started looking into possibilities. This is when I discovered that prices and sizes that fit my needs and budget was going to be a battle. Let me walk you through this - The pads I have that I would need to store together range between 9x12in (22.9x30.5cm) to 12x18in (30.5x45.7cm) which means I need something that would fit the largest size without issue but have room to accommodate the various smaller pads. I also am budgeting myself about $60 with a buffer
just in case it would cost up to $10 more for shipping and taxes. While looking through my options, I found several possibilities which would fit my size requirements however the prices were more then I was willing to stomach. One such discovery was this children's construction paper holder that had 29 3/8 x 12 ¾ x 15 inches as it's dimensions but a price tag of $151.21. There were several storage possibilities that were within my budget but the size accommodations would not work for my needs. Discussing my frustrations of this with my father, we agreed that my best option would be for us to look at wood and he would make an organizer for me that would satisfy both my needs and stay within my budget. The added benefit of this would be any leftover wood would be saved to be put to future projects.


Sauder 6-Cube Storage Cubby

Now the next hazard along this path was where the hell was I going to put the organizer once we were able to build it. Underneath my desk is completely out of the question since I already have various storage containers under it to. I also have no space in my bookcases which could accommodate it. So my only other option is my closet. Of course that means that I need to do a deep clean of the closet and see how much room I can make in order to have enough room for the organizer. That is where I am at right now. On the plus side, this is something that I've been needing to do for some time but now there's more of an urgency to it. One of the things that I've found that has helped are these small cube storage options. I was able to find the 6 cube option through Big Lots for only $29.99. Since I'm not concerned with color since they're going into a closet, I grabbed what ever color I could. Of course if I wanted to have them a different color, there was always the option of just spray painting them at a later time. Still have quite a bit more work to do but the small bits of progress has been rather encouraging.


So wish me luck, fellow DIY folks. In the meantime, if you're wishing to catch up on my cleaning odyssey then here you go: 

Part 1 - New Year, New Journey
Part 2 - Where do I put this?
Part 3 - Prepare the Tools
 

Saturday, March 6, 2021

And Now for Something Completely Different


Dawn! How's the reorganization of your space going? We haven't seen updates!” Yes, I can hear you all. However, my fellow adventurers, we're going to side our battle with trying to figure out what the hell we're doing with the space for a moment and get some work done. So, ladies and gentlemen, enjoy this small intermission from organization and cleaning updates.


'Snake Medicine' by Dawn Star Wood
Snake Medicine Design
As some of you may know, I have a small shop on the Redbubble website where I have some of my designs on products. The newest in the collection is Snake Medicine. I officially added it to the shop early February and it's currently on mugs, phone cases, shirts, stationary and tote bags. The original design was done in watercolors and micron pen on watercolor paper. This was perhaps one of the more daunting designs I've done since the scales on the snake took me so long to do since I normally don't 

Snake Medicine on Redbubble


'Reading Buddies' by Dawn Star Wood

Reading Buddies Design

Late last year I created this design of basically a miniature me riding on a whale who was gently gliding through space, all the while reading a book. Created in watercolors and micron pen on watercolor paper, I fell in love with this piece and decided to keep the original. This particular one is also available on my Redbubble shop but this month, for a limited time, I made a small batch of stickers and acrylic pins of the design available for purchase.

Reading Buddies on Redbubble


Peonies and Forget-Me-Nots Dice Box

Those who are long time followers are familiar with my various random refurbished box projects I do from time to time. This particular box was originally a random project I had done several years ago but was never satisfied with so tucked it into my private random wood pile. While sorting through things in my cleaning, I stumbled across it and decided that I would give it new life. So sanded the old design off along with the box as a whole to prep it for the new design, switched out the hardware, do minor repairs, felted the inside and made it so there was a little slot for a player to tuck some character sheets away. Overall, the project took me

about 2 weeks to do, with some understandable pauses along the way (waiting for glaze and glue to dry). I love the end result with how everything works together.