Saturday, December 30, 2017

Starting with a clean slate

Desk - Where I live 12 to 15 hours out of my day.
With the New Year basically around the corner, I found myself in desperate need to completely reorganize my work area. It had been a long time that I had such a strong desire to change something about my little space but not only did I feel the need to do this but to have it completed before the end of 2017. With me working from home, my side of the master bedroom is basically a library/office/art studio. Of course, my biggest challenge would be how to rearrange things and make things work with such a tiny footprint (4ft 3in x 4ft 2in). The task would be made even more challenging with the fact that I would not be able to move any of the electronics (computer tower, monitor, modem, etc.) and the fact that the desk was secured to the wall in a corner.


Brainstorming and Advice 
Work space inspiration
Looking at various images of art studios and mini office spaces, I was getting inspired but at the same time finding 2 issues - 1) Most art studio spaces either have a lot of wall space or take up an entire room 2) Most small office spaces were up against a flat wall and not in a corner. I was also finding mini art studios that were set up in micro-houses and even small garden sheds. Even with those issues, I was seeing quite a number of inspirational images. So as I tried to figure out what I should do, I contacted my long time friend and fellow artist Stephanie Law and asked her for some advice.

Me: Hi there Stephanie, have a bit of an odd question for you. Trying to figure out how to reorganize my work space since it's a small space and was wondering how you have yours organized.

Stephanie: Anything specific?

Me: I'm mostly trying to focus on my desk area which is mounted in a corner with a shelf above it since that's the only space I really have. So I'm wondering how you have yours organized since I think you have just as much or more art supplies you work with then I do. 

Stephanie: I basically put everything away if it's not in  current use
So I only have the specific brushes out and my paint. 

Me: Hmm I might have to move the containers of house paint off the desk then. I have most everything in containers that I can see their contents but I have a collection of house paints over on the right side of my desk that I commonly use for some of my wood projects.

Stephanie: Yeah I don't have anything on the desk not in actual use in the moment.  All in drawers elsewhere

Me: I'll take that into consideration then. Thanks for the input though! You've helped me a lot.

Stephanie: You're welcome!

Her words made me think as I looked at the disheveled chaos that I had going on. Art supplies were scattered about, what little storage containers I had things were in less then optimal locations, and there was a certain layer of just scattered debris which made work and inspiration difficult. Her words made me realize that I needed to teach myself to actually put things away when I was done. This meant that I needed to make sure that I had suitable storage solutions for limited space I had to make sure that supplies were up and out of the way but still accessible without me having to dig for things. 

Rearranged, reorganized and cleaned
And so it begins
My first step was to remove everything from the desk and walls so that I could give the area a much needed dusting and cleaning. Around this time after taking down a large framed piece down that I had hanging, I discovered that it was only being held to the wall by 2 thumb tacks. Considering the fact it had been hanging that way Well that was certainly something that I needed to fix quickly. So quickly I tracked down nails and a hammer to give it a better spot on the wall. Since I was rearranging things on the walls, I also ended up hanging up 2 of the skateboard rehabs I had done so I would no longer have them as tripping hazards. Having a long strand of rainbow LED lights that I was previously using as decoration at my desk, I taped the strand under the shelf in order to provide lighting underneath. 

Some of the other changes were rather simple but had a surprisingly positive impact. One of them was moving my brushes, tools and color pencils from one shelf to the other and giving the figurines and such I had on display over to the shelf that I had the pencils on. The second simple change was getting 2 containers to help keep paints and other supplies organized and out of sight so they weren't all over the desk. Once I was able to get everything into their new positions, I took a seat at my desk and couldn't help but take a satisfied look around. I'm so thrilled with the result. Now.. how long will I be able to keep it in this state? 

Tuesday, November 28, 2017

Romance, Magic, and Art Books

Some time during 2016, long time friend and author Stacy J. Garrett had tossed out the suggestion to me to be part of an art book that she was thinking of adding to a series of novels that she was working on at the time. At the time, I joked around and said yes. Early this year, as she was wrapping up the last of the books for the series, she contacts me again and let me know that the art book was still going to be part of it. So that meant that I had a sizable job ahead of me. 


Welcome to the 3rd District
Book covers of the 3rd District Series
"Classic faerie tales get a modern makeover in the magical 3rd District of New York City where happily ever after is just a contract away" is the tagline for the series as a whole. Each book within the 3rd District series is broken into 'files', each focusing on modern interpretations of faerie tales that you know and love from your childhood. Filled with romance, suspense and, of course, magic, Stacy's attention to detail fully immerse her readers into the world. Each book also comes with a bonus short story. 

The Shaughnessy File - Youngest sibling Aenya Shaughnessy is dancing her way through her shoes every night-without ever leaving her room, and only a savvy private investigator might know the right steps to catch her. Kienan Shaughnessy throws his dreams of a musical career on a wild gamble that takes a detour once he meets a plain nightingale suffering a lonely curse. Eldest sibling Taegan Shaughnessy unexpectedly gets a new pair of glass slippers as he pines for a princess out of his reach. Mel Shaughnessy, the wild-spirited beauty of the household, finds himself at the mercy of a tutor nicknamed 'the beast', yet sees something much deeper under the surface. Can there be a happy ending for the whole family?

The Carmichael File - Sleeping beauty Rayna Carmichael has no idea what danger sent her into a coma for fifteen years, and an undercover warlock will have to find the truth before too many lies tear them apart permanently. Spirited Gwyn Trahern is marked for death by a jealous enemy, and only an artist with a gift of his own can save her from a poisoned apple. Confirmed bachelors, the seven Trahern brothers are content with their lives until they meet the seven sassy Germaine sisters, and with a little help from an enchanted locket, there might just be seven happy endings.

The Dease File - Local prince Cameron Dease finds himself in quite the pea-ckle as his mother tries to force him to get married against his will, but the sensitive skin of the secret princess he truly loves might just save the day. Upper and lower class collide as Kenneth Dease finds himself falling in love with a diamond in the rough, and only a magic lamp might save them both from a cruel wish designed to tear them apart. Surrogate Dease sister, Louise Pram, finds herself tangled within a handsome weaver's past and future alike, and it will take soul-searching for them both if they want to finish their story to a happy ending.

The Lucino File - Local princess Isabelle Lucino finds her world flipped upside down when she runs into 3rd District pauper Gabrielle Wisteria and they discover they could be identical twins, but an attempt to live in each other's shoes for a day only sets the entire Lucino family on its ear—and creates some dangerous stakes. Heir apparent Rafael Lucino has been in love with his bodyguard for years, but convincing his ugly duckling that she is as beautiful outside as in will be hard to do as evil closes in on them both. Family friend and almost-daughter Theresa Adams is a sheltered Rapunzel trapped in a tower she cannot escape, and only a dangerous and unlikely prince in disguise will be able to free her in time to save the entire Lucino family as a whole and bring their story to a happy ever after.

The Taber File - The finale has come! For 2000 Years, Rhianna Taber has played matchmaker extraordinare and helped thousands find their happy ever after. Now the immortal executive faces her toughest challenge of all: turning her own marriage contract from a "Void" to "Complete". With some luck, friends, and maybe some magic beans, the District's protector might finally have her ultimate happy ending.

Interested in ordering the series yourself? Stacy has all of her books available to be purchased on Amazon.com in both digital (Kindle) and paperback formats. Also, through her website, she offers the option of being able to read the first chapter of each book to capture your attention.  
Check it out here: 3rd District Series 


3rd District Official Art Book
Art Book 

Having worked with Stacy several times in the past, I knew that the project was going to be intense and I wanted to do her series justice. What she was needing me to do was do images based on the description of paintings that are found within the 3rd District series. With a total of 18 images suddenly on my plate to tackle, I became one with my coffee pot and paints and dived right on in. There were several times where I had to take a break due to hand cramps or eyes not being able to focus on any other color due to what I was staring at for long periods of times. However, even with these setbacks, I pushed through and was able to complete the project. 


'The Swan and the Nightingale' by
Dawn Star Wood
Perhaps my personal favorite of the batch was one for 'The Swan and the Nightingale'. It was one of the few times I actually didn't want to give a client the image they requested and just keep it for myself. I'm not quite sure as to why I was drawn so much to that image in particular. Of course I did give the stack of images to Stacy once everything was completed, to which I received gleeful squeals as she looked through each and every image. 

The art book is filled with photography images from the series, other sketches I had done for Stacy that was for the short story bonuses, and small excerpts explaining everything. It is a delightful visual tie into the 3rd District series and is certainly the cherry on top of a literary cake. 

Wanting to add the art book to your collection? You're able to find it available on Stacy's website. She lets readers know that if you have already purchased the hardcover or are ordering the entire paperback series, the art book is included in your purchase. However, if you wish to have it as a stand alone, you can purchase it. 
Check it out here: 3rd District Official Art Book 

Monday, November 13, 2017

A lot to ponder

What started off as something that I was working on for October as something Halloween themed, slowly turned into what I can only describe as an intense brainstorming session. I don't normally do dark fantasy imagery with my work so it being the season for it at the time, I thought it would be a fantastic opportunity to experiment and push myself. 


Top: Golden Thread Tarot, Spirit de le Lune Oracle,
Cosmos Tarot & Oracle
Bottom: The Marigold Tarot, True Black Tarot
It was only a suggestion

Around the same time I was working on the painting, I was chatting with a wonderful friend about some artist created Tarot and Oracle decks that I could see her and I add to our respective collections. Such decks that were brought up included Golden Thread Tarot Deck from the Labyrinthos Academy, Cosmos Tarot & Oracle Deck from the Light Grey Art Lab, True Black Tarot by artist Arthur Wang, The Marigold Tarot by Amrit Brar, and Spirit de le Lune Oracle Deck by Rachael Caringella and Marissa Moondaughter. Jokingly, I made the comment to my friend of "What would happen if I ended up creating my own Oracle deck". Of course I wasn't prepared for the amount of enthusiasm and encouragement she would showed for the idea.  


So many things to consider

In-progress sneak peek of
"Deep Water"
Returning to the painting, I found myself pondering the discussion. Would anyone actually be interested in it if I attempted? Who would I have to contact to actually go about getting them created? Would I have to put it on Kickstarter or even Patron to help get the project funded? There was just so many questions running through my mind that it was surprisingly difficult to concentrate on completing the image.  What started off as a simple experiment using a darker color pallet then what I would normally work with was evolving into the flickering start of what may or may not turn into a passion project. Again, as I came closer to completing the image, I spoke with my friend about the earlier suggestion. I explained to her that if I did finally decide on moving forward with the idea, what would the theme of the deck even be? The only thing I knew for certain was that I wanted the image that I was working on to be titled Deep Water. With that being the only piece of information for her to go on and a glimpse of the nearly completed painting, she put it out to me that the work I was doing seemed to be directed towards the deeper side of the psyche and emotion then what many of the other decks are out there. It was an interesting point to think about. 
Left: Finished painting of "Deep Water"
Right: Experimental alteration of what "Deep Water" would
look like as a card

Once done with the image, I couldn't help but play with how it might end up looking like as a card. Of course it was simply to satisfy my own curiosity but it was an interesting experiment. I still have plenty to think about if I ever go down the route of making an entire deck. Another possibility would be an art book but again, I would need to think about the same series of questions that I had if it was a deck. 

Thursday, November 9, 2017

Out with the Old, in with the New

Box in its original state
Recently I found myself doing another box rehab. I'm not sure where my dad or I had picked it up from but it had been sitting on my desk for a good month or so staring at me. There was absolutely nothing appealing about it other then the size. The hardware was bad and the box itself was covered in what I could only describe as really bad wallpaper which had a fake snake/alligator skin texture to it. Finally I just couldn't take it any more and decided to make it my next project. 

Ready. Get set. START! 
First step was popping off the hardware. I discovered quickly that the hinges and lock needed to be completely replaced. There was something about thin aluminum hinges that bent easily that was a dead giveaway. So I used a nail file to pop the pieces off, watching little pieces of metal shoot across my desk. Next step was to find a way to get the paper
Outer layer of paper and hardware removed
covering off. Talking it over with my dad of how best to go about it. Originally, the plan was to use sand paper and work through the paper to the wood. I discovered that it wasn't the best idea. The reason was that, with the wood of the box already being thin, it was difficult to gauge how far I needed to go. So, though painstakingly slow, I took an exacto blade and carefully peeled the paper off. This alone took me about 4 or 5 hours, resulting in tired eyes, hand cramps and an aching back. On the plus side, I was able to get the top layer of paper of. It was also an interesting way to discover that the second layer of paper, due to what ever adhesive was originally used, was basically melded with the wood causing it to be impossible to separate the two. It didn't help that I had discovered that the box was made out of a rather porous grade of cedar and was itself being held together with a type of glue and not nails or staples of some sort. 


Filling in gaps

Reconstruction and reassembly 
After sanding what I could, I used my smaller desk lamp to use as a way to find cracks in the wood that needed to be filled. The bottom half of the box was fine but the lid needed some minor repairs since the paper was no longer there to keep the box together. Using some of my E6000 adhesive and a thin stick, I carefully filled in cracks and left the glue to cure completely (overnight). 

The painting process itself, though simple, took most of a day to do since Autumn has started to settle in making painting outside take a bit longer to to wait to dry. Starting off with a black enamel paint, I added hints of a midnight blue then did a bit of a sponged antiquing to it with a metallic silver before doing about two layers of clear glaze. With so many layers and the weather conditions since I was working outside, it took a bit of patience on my end to wait for everything to dry properly. Since I had started in the early morning on the painting process, the layers took until late afternoon/early evening to be at a point where I could continue working on the box without having to worry about leaving finger prints or having to repaint at some point. Of course, silly me, had made sure to wear a dust mask during the paper removal process but during the painting process I hadn't used that precaution so spent most of the day smelling and tasting paint fumes. 


Inspiration on box concept
Next up was the interior. To act as a barrier between the wood and what ever might end up being placed inside of the box, I used red felt and lined the inside of the bottom section. It gave the box a much needed splash of color and softness to the harsh edges. The inside lid was a completely different matter. Being drawn to Asian aesthetics and Steampunk/Victorian whimsy during this part of the process, I decided to combine the two styles. Looking through things that I had on hand, I decided on a piece of origami paper which I carefully measure, cut and glue into the lid. Once in place and making sure that there was no air bubbles or wrinkles, I took my can of clear glaze and heavily sprayed the interior. Basically I was using the glaze almost like a clear apoxie alternative. Making sure that the lid was laying on a level surface, I let the layer dry completely before adding another thick layer. An interesting result to this was that the origami paper became subtly translucent and was almost reminiscent of a stain glass window. To complete the inside of the lid, once the sprayed clear glaze was completely dry, I used adhesive to glue in decorative corners (typically used for the outside of frames or boxes) inside so that it could double as a possible extra storage area. 
Finished box

Once I replaced the hinges with better ones I made the discovery that, due to how the box was, no matter how tight I had the hinges on that the lid would still seem loose. So, for my own piece of mind, ended up using adhesive on where the attachments were in order to be sure that the hinges wouldn't get loosened too easily. Since I couldn't find a latching mechanism that was the same style as the hinges I was using, I went with something a little decorative and perhaps not very conventional. I had a piece of silver ribbon laying around so I decided on making it as a little handle for the lid. Personally I would have liked to have had some kind of closure system for the box but since I was limited on what I had on hand, this was an acceptable alternative on my part. I'm actually pretty happy with the end result of the box and the fact that it has a nearly curiosity cabinet feel to it just makes it just that much enjoyable. 

Tuesday, November 7, 2017

Blank Paper Inspiration

I have a tendency of accepting unfinished art supplies from friends who are cleaning out their own supplies. Usually it's unfinished paper for either pencil or watercolors, random tubes of paint, or tools they no longer need. Basically odds and ends that I could always use for smaller projects but it's not enough for the original owner to do anything with or they've decided they no longer have the room for the items. In a way, it helps me out since I don't always have the ability to purchase supplies but trying to keep things organized does get rather creative. It usually results in having random bags scattered around and having to figure out what items are where. 

While looking through a recently acquired bag of random items from a friend, I discovered that it contained a pack of blank Artist Cards, mini envelops and bits of one-off cuts of paper. Considering the time of the evening that I was looking through things, I was struck by a random bit of inspiration. Off and on for a couple of evenings, I ended up creating little illustrations that ended up being my interpretations of priestesses for the various elements. However, I felt that there was something missing. After a bit of thought, I realized that my solution was creating prayers for each one.  


Prayer of Light
I pray for the blessing of Light
May the fire within me never die out. 
Let me kindle the flame of passion & strength within others. 
May I be reminded that even in darkness that the
tiniest flicker glows bright. 


Prayer of Earth
May I receive the blessing of Earth
I pray to learn how to nourish myself. 
Teach me that even with death, there is life.
May I find balance between myself and the world


Prayer of Air
I pray for the blessing of Air
Allow the perfumed clouds from my offering be accepted. 
Teach me to hear the song around my being. 
May my voice, no matter how soft a whisper, be heard. 


Prayer of Water
May I be blessed by Water.
Allow my thirst be satisfied. 
May I be cleansed by the rain that washed over me.
Teach me how to ride through the storm & arrive safely
on the other side. 


Prayer of Spirit
I pray for the blessing of the Spirit
Teach me how to listen to the guide within myself.
Help me understand the strength I have inside. 
Remind me to take time to enjoy the whimsy of the 
magic around me I once saw through the eyes of a child.


I was really happy with the end results of the little project. Of course I realized after I had finished the last image in the group (Spirit) that the colors that I used for the priestesses did not correlate with the standard and widely accepted element-to-color pairings. For the wiccan/pagan community, the element-color pairings are usually:
  • Water - Blue
  • Fire - Red
  • Air - Yellow
  • Earth - Green or Black
  • Spirit - White
Where as if you go the Eastern direction, the element-color pairings are: 
  • Fire - Red
  • Water - Blue or Black
  • Wood - Green 
  • Earth - Yellow
  • Metal - White or Silver
As you can tell, after realizing that I didn't go the standard route for the combinations, I went ahead and accepted that these were my interpretations. Honestly, I went with what was best for the image and the feeling I wanted to bring forth from them. So, even though they aren't the standard things, I'm actually very happy that I went with my gut on them. 

Monday, October 30, 2017

From Trash to Treasure - Final

Finally we have reached the end of this project and I am thrilled. After taking you lovelies through part 4 and doing so much trouble shooting along with daily life, I decided to take a step away from the doors. So I have returned back to this adventure and was able to finish it up. 


Always double check
As a recap, in part 4 I took you through the process of me redoing the knobs so they were the style that I was wanting, my troubles and tribulations in concerns with the gold leafing, and correcting the issue with too much shine. After taking the lengthy break from the project and coming back to it, I found that I was still satisfied with the matte finish to the entire thing. There was one small correction that I wanted to make, however, to the gold leaf trim. Though it did have the 'unfinished' look I was going for, I realized that there were several spots where the gap between pieces of gold leaf were just too much for what I was looking for. Solution? Using the same gold metallic sharpie marker that I used on the doors themselves, I carefully went around the edge and filled in the holes where it looked a little too unfinished. With that taken care of, it was onto reassembly. 


Coming together
Doors assembled and knobs added
Reassembling the doors actually was the least time consuming part of the whole project. Reattaching hinges, attaching picture frame hangers to the back so that it could be hung on the wall if desired, and reattaching the doorknobs went along smoothly. Of course I had asked my boyfriend to pre-drill the holes I needed to screw in the hangers in the back because I did not trust myself. There was just something about the thought of accidentally drilling all of the way through the wood after I had spent so much time to save it that gave me a bit of anxiety. Not that I wouldn't have been able to use wood putty to fill in the hole to fix it, but it was the principle of the whole situation. So luckily he humored me and came to my rescue. 

After taking a step back once everything was in place, I realized that if anyone decided to give this a home, they could easily add to the decorations. Imagining someone putting a string of star and celestial shaped beads between the knobs or even adding their own embellishments to the doors themselves was all completely possible. Of course the thought of that actually just tickled me. But, even
Close up of knobs
as it is, I'm happy with the end result. 


So thank you for joining me on this little adventure and a peek inside of how my thought process is with things. 

Saturday, October 7, 2017

From Trash to Treasure - part 4

Small stars in silver & white paint
Enter a new chapter of my ongoing journey of re-purpose a set of cabinet doors. With delays, problem solving, and daily life, this part of the process took a bit longer then it should have but I will take you through this part of the adventure. 


All about the details
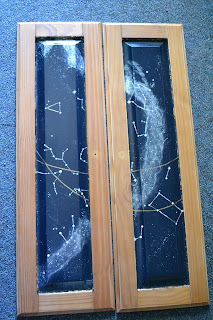
Where we left off on Part 3, I had just put in the main 'constellations' on the doors. I ended up going back through and started putting in the smaller stars in the Ralph Lauren metallic silver paint and slightly watered down white acrylic paint. I didn't want the star clusters to completely take over the doors so I kept my focus on the 'Milky Way' and did what I could to make it feel like organic placement. Once dried, I used a gold glaze paint to put in the lines that went through both doors along with the inner trim of the panels. Though the right color and feel that I wanted to have, I was just not fully satisfied with how the paint handled. It was too blobby and uneven for my taste. Honestly, it was a rather frustrating issue to have which caused me to step away from the project for a day or 2. I knew that I needed to figure out another solution but if I fussed with it, I knew I would screw up with the project as a whole. 

Refurbishing the original knobs
During my break from the doors, I put my focus on the knobs. Like I had mentioned in a previous blog, I had decided to reuse the original knobs that came with the doors since I wanted to have something that actually went with the color theme and feel I was aiming for. As I did with the doors, I took some sandpaper to them and took off what ever junk that was on them. I had recently purchased a 2 part apoxie called Apoxie Sculpt off of Amazon.com originally for a totally different project that I had planned but decided to use a little bit what I was aiming for. Following the directions on the containers, I went ahead and did a stylized sun design on one knob and a star on the other. With how small of an amount I used and how the environment is at my place, I only had a tiny window of opportunity to work with the apoxie before it dried. Allowing it to cure completely, I did a little sanding before spraying both knobs with the same color I did the doors, followed by a light over glaze of silver to mimic the 'Milky Way' on the doors. 

Problem Solving
Un-tapeing the doors
As I had mentioned before, I just wasn't satisfied with how the gold paint was not really doing what I was wanting to achieve. The gold glaze was lumpy, uneven and left visible brush strokes. Taking a couple of days to figure out a solution to my issue, I ended up coming up with the insane idea of gold leafing around the inner boarder of the panel. Since I had never done gold leafing before, this was going to be a bit of a learning experience for me. Following the directions on the packaging, I dived into this new material for me and started work on the doors again. With the occasional moments where I would get gold leaf glued to my fingers, I made my way around first one door then the next. I actually enjoyed the seemingly uneven/unfinished look that the spottiness of the gold leaf created. 

Now what about the gold lines on the doors? Gold leaf wasn't going to be the answer. Digging around among my supplies, I ended up rediscovering that I had metallic sharpie markers. So using the gold marker to rework the painted gold lines then the silver on some of the constellation stars. I also ended up using a bit of the gold marker on the door knobs for a little added color. 

After 2 layers of clear matte spray paint
There was another issue that was bugging the hell out of me about the doors. The base paint that I used was, well, too shiny. The color was perfect but I wanted to not have the doors shiny enough to make out a person's reflection. Solution? Strangely enough a clear matte coat. Removing the tape that I was using to mask off the wood in order not to get the other paint colors in locations I wanted, I took the doors outside to be sprayed. After one or two coats over the doors, the annoying shine actually went away much to my relief. I ended up giving the knobs a coat of the matte finish as well just so they would be at the same appearance as the doors themselves. All is left to do now is prep the doors for hanging and completely reassembling them. 

To be continued...

Thursday, September 21, 2017

From Trash to Treasure - part 3

Before & After of Sanding
Ready for a day of adventure, research and paint fumes? Well you're in luck. That's how things are going for me at the moment. Welcome back to my journey of re-purposing a set of cabinet doors. Where we left off in Part 2, I shared my process in getting the doors prepped and ready for paint. 


When in doubt, double check 
With the doors sanded, dusted, and cleaned so that they were free of any debris that might disrupt the painting process, I had another look at collection of inspirational images I had for this project. I knew that I wanted to do something celestial but thought it best to refine what I was aiming to portray. After a bit of thought and roaming the internet, I narrowed things down to doing a bit of a homage to vintage and antique star charts. Finding several images
Top center Star Chart chosen as rough map for project
that I felt fit the bill, including an image of an antique star chart originally created in Korea, I took the time to look at similarities. All of the ones that I was looking at had a common theme of having the Milky Way represented by this beautiful organic ribbon of stars that went through a section of the map with no definite shape. There was also, of course, the use of lines to suggest the path of the moon along with the suggestion of constellations. Choosing one of the maps for a basic templet,  I made sure to remind myself not to stress about having everything in exactly the same position as my reference. That was certainly going to be something that I would probably need to remind myself through most of this, or at least some sort of mantra of "Don't worry, the process is an adventure". 


Before & After base coat painted
Preparing for the next step
With my mind made up, reference selected and plan in place, I was ready to proceed. First step in this would be making sure I had the materials I needed. Low and behold, I was actually missing something. The perfect shade for the background. Though I have plenty of various paints that I have in my collection, I actually did not have the right shade of blue that I wanted to use as the base coat. So off to the local Home Depot I went and acquired a can of Rust-oleum's 2x Ultra Cover in a Satin Midnight Blue. Of course before I could start the painting process, first came masking the doors. Using my widest roll of painters tape, I worked on masking off the section of the doors I didn't want to get hit with the base coat of paint. Readjusting a few times, I eventually was able to get the doors ready for their first blast of color.

Become one with the paint
Start of the painting process
(From Left to Right) Roughing in the Milky Way,
pencil in constellation points, & painting initial
constellation points
Once the base coat was on, I returned to looking at my reference to see what I was going to be doing next. I figured that my best bet would be the gesturing in of the Milky Way. Luckily I had just the right paint for what I was going to use - a bit of Ralph Lauren metallic silver paint. It's supposed to be one of those paints that adds a subtle silver iridescence to other paints and lighten them up a bit but I decided to use it straight. Originally with a broad brush before going in with napkins and making it more organic. I knew I needed to work quickly since the paint would get to a point where it would be already nearly dried to do anything with. 

Making sure I was satisfied with how it came out, I let it dry before arming myself with a white color pencil. Looking at what I had then at the image I was referencing, I lightly marked in some of the constellations between the doors and some other lines for myself as points of reference so I could go in with my other paints.  As soon as I painted in the main points for the constellations that I put in, I couldn't help but have a feel of enjoying how the doors were coming along. 

To be continued...

Monday, September 18, 2017

From Trash to Treasure - part 2

Day 2 of the doors is here! Join me on my ongoing journey to redo a set of discarded cabinet doors into a piece of wall art. 

Doors with hardware removed

Troubleshooting
After having a cup of coffee, I worked on removing the hardware from the door. Of course my dad was nearby watching me be armed with a screwdriver. The outer hinges were easy to remove, as were the knobs themselves. The slight difficulty came from the fact that the screws themselves were stuck in the door. I have no problem with the fact that they were countersunk into the wood but I had to use the handle of the screwdriver to push the screws back out of the holes. Speaking of the knobs, I found myself pondering reusing them as well (with alterations, of course) instead of purchasing new knobs that aren't exactly what I have in mind. 

While I was getting the hardware off, I was explaining to my dad about how I've figured how to make the doors into a wall hanging. As I was falling asleep last night, there was a part of my brain trying to figure that out and I realized that though I wanted to have it wired much like you would a picture frame, a single wire across the entire thing would not work. It would be too much weight being placed on a single wire and nail. So instead, I am thinking of treating each door as a frame so both would be wired for 2 different nails. That way, the weight is distributed evenly. After explaining the idea to
Above - Some of the damage that needed to
be sanded out
Below - The original knobs to the doors
him, dad thought it over and agreed that it seemed like a logical course of action. 


Examining the doors now that the knobs and outer hinges were removed, I quickly discovered that I would indeed have to sand the entire thing. I was noticing small dents and scratches around the entire outer frame of the doors. I also made the decision that instead of just focusing on the raised middle panels which would only give me a 4 inch x 30 inch space to work with, that I would use the space up to the outer frame to give myself more room. So with that, I get to be one with sand paper and a lot of patience to get the wood prepared before I do masking. 


Just keep Sanding
Left - Door that hadn't been sanded yet
Right - Door that was at the halfway
point on sanding
Using a rough 100 grit sandpaper, I started the process of sanding the doors to  at least smooth some of the damage out while also getting the protective layer off of the wood. Sitting at my front door, I just worked on sanding. Occasionally I had to wipe the door down with a clean rag to clear off the dust layer so that I could see where I needed to do a little more work. For the 2 hours or so my life was sand, wipe down, examine, repeat. Some sections were a bit more stubborn then others when it came to removing the clear lacquer that was on the the doors. After a bit of work and getting coated in a  layer of fine baby powder consistency dust, I finally was able to get the doors the way I needed them.  Of course I asked dad and my boyfriend for a second opinion on if I needed to do a bit more sanding but both agreed that I had the wood at the perfect feel if I was going to repaint. They also gave me a suggestion on how to remove the rest of the fine layer of dust that was now on the wood as a result from the sanding process. The next step would be to do masking and map out what I'm going to be doing. 

To be continued...

From Trash to Treasure - Part 1

After the positive feedback I had received from followers on Facebook about wishing to follow along with my behind-the-scene adventures with my various projects, I asked if they would want me to do another. Without hesitation, they said yes. 


In the Beginning
Earlier in the year, my area had a junk day. Basically it's a designated day for certain areas to be able to put large items that would not normally be able to be put into the trash or recycle bins that could be picked up by the city without homeowners being charged. Ever so often the items that are put to the curb are still in relatively good condition or be re-purposed. A friend who was local ends up sending me a message that she had salvaged a wooden cabinet door that was still in good condition and was wondering if I would be interested. Though at the time I wasn't sure what I would do with it, I said sure. Eventually, when our schedules allowed it, she came by and dropped it off. For the following months, the doors would get moved around the house and each time I would look at them and be at a complete loss as to what to do with them. 


Random Inspiration
DIY Box Rehab 
With my dad still working on recovering from his knee replacement surgery and a major project that I was collaborating with author Stacy J. Garrett with done, I've been finding myself being unusually creative and productive. This is especially true in the late hours of the night. Often I find myself watching lengthy digital speed painting videos by such artists as Apterus Graphics and Celtic Botan, doll customization by Dollightful and Nicolle's Dreams, and even Adam Savage's One Day Builds from his Tested channel. I'll have their videos playing while working on random projects (such as the reclaimed box from my DIY Box Rehab post and even a small custom paint job I had done on a doll for myself). 

It was during one of these late night art inspirations where I realized what I wanted to do with the cabinet doors that had been roaming the house late at night. While looking for references for something completely different, I realized that I could possibly make the doors into a wall hanging of sorts and possibly make them either decorative a person could use them in a personal sacred space. What caused this sudden moment of inspiration? Oddly enough, after completing the box, I spent the night watching Van Helsing, League of Extraordinary Gentlemen, and looking at star charts. A strange way of having an EUREKA! moment, but I'm not about to complain. 


Brainstorming
I knew that with this kind of undertaking that I would need to do a bit of brainstorming. The doors were hinged in the center so they would originally slide open in a folded manner when they were attached to the cabinet and I wanted to keep it that way. However, I would need to remove the hinges that were on the left side along with removing the knobs that were original to the doors. I have plans on replacing them with
My visual brainstorming notes that help keep things
slightly sorted out but with the flexibility for changes. 
different knobs later on in the project's completion. 


The next step was to measure the size of the raised panels. With each door having a rather deep section between the railing (surrounding trim) and the panels (middle section), I was going to treat that much like the mat and framing of a picture. So keeping that in mind, I gave myself a note to mask off what I don't want to work on and that I would need to sand the panels to get existing finish, stain and oils off of the wood in order to have a clean surface to work on. Now, for that panel measurement. I was stunned to discover that the panels measured 4 in x 30 in which meant that I have less room then I originally thought for what I want to do. Just means I need to remind myself that I need to be flexible with what I'm wanting to accomplish. The other bit of troubleshooting that I need to keep in mind as well is possibilities of how to attach wall hanging options to the back without damaging the front face of the doors. I do believe a trip to the local hardware store is in order. 

To be continued...

Saturday, September 16, 2017

DIY Box Rehab

Recently, my father had gone through knee replacement surgery so, with me living with him, it meant that I needed to come up with projects for myself that would allow me to do art but wasn't time sensitive like my usual watercolors. That way I could assist him as needed without worrying about possibly ruining what I was working on. Luckily, I have some things around the house that I've been holding on to with the purpose of making into projects that I'm finally having a chance to work on. 


Before the changes
A few months back, dad had brought home an old wooden box from a job site which was destined to be thrown out. It was in relatively good condition but did need a little work in giving it some new life. Some changes I knew that needed to happen was the handle/knob for the lid needed to be switched out to something a little larger for easier use. The second change was that the label holder on the front of the box needed to be carefully popped off and the rust cleaned off. Beyond that, I was basically going to allow myself to go with the flow and see where it was going to take me. 


Hardware rehab
The original brass knob was easy to take off of the lid, which I set aside to analyze later. The label holder, however, was a little more tricky to do. Going to my dad, I asked him for his opinion on how to approach the task. With his guidance, the label holder was carefully popped off to discover that it had 2 labels jammed into it and had laminated themselves to the metal. With a bit of a clean up with a sharp blade, the paper and glue was removed before I went about to remove the rust from the front side. He did warn me that depending on the level of rust, that there would no longer be the brass patina to salvage so I would have to repaint it. As I carefully worked and removed the rust, I found that it was indeed the case. Luckily I have plenty of different colors of spray paint on hand but that would depend on what I was going to use to replace the knob with. 

Going through some of my collection of salvaged knob handles that I save for possible uses, I settled on a beautiful cut glass knob that fit with what I wanted. It was bigger then the original so there would be ease of opening and closing the lid but it wasn't so massive that it would be out of scale with the box itself. Masking the glass for the knob so it wouldn't be hit with any over spray. I took the hardware outside and spray everything with a coat of metallic silver spray paint. I rarely use this particular color and the reason why is that unlike most colors, Restolium's Metallic Silver remains tacky to the touch past the 1 hour mark and will not be fully dry until for 24 hours. So it's certainly an exercise in patience when it comes to using this particular paint. If you end up using this paint and need to speed up the drying process, I would suggest to have the items placed out in the sun to help with it. 


Bringing in new life 
I'm not sure why but I decided on going with an insect theme with the lid of the box. Taping off the edge all of the way around, I ended up using a mix of paint, color pencils, and gel pens to create a dragonfly and a scarab beetle. So that there was no 'right way' with how the lid was placed back on the box, I did each in opposite directions. Once done, I did an initial coat of clear glaze spray paint. Having used wood glue and toothpicks, I filled in the holes that the tack nails were originally in so that during the reassembly, they would be able to hold firmly in place. Once the glue was dry, I trimmed the toothpicks as close to the box as I could. Removing the tape from the lid, I sanded the 'trim' I had artificially created and also sanded around the box before giving both a coat of the clear glaze. This causes the lid to have a very subtle texture difference without having too much added to the initial design. 


Reassembly 
Making sure that the hardware was done with its drying process, I de-taped the knob and got it attached to the lid. Reattaching the label holder proved to be scene of frustration. I found it a bit difficult to hold the tiny tack nails in place long enough tap them into place. After a bit of a struggle and some advice from my dad on how to accomplish my goal, I was able to get the ludicrously small nails into place. Luckily the only thing I needed to fix was to do a bit of paint touch up on the nails. The end result is quite lovely to look at is a perfect holder for small items, jewelry or even random office supplies.